About Me

I am KK. I graduated from The University of Texas in May, and am embarking on real life. I am starting my real job, decorating my real apartment, and trying to cook some real food.

I work at a large consulting firm, and enjoy posting these sweet indulgences whenever I have the time.

I am happy to have you here, please feel free to explore.

I am still building, so many of my pages are in progress, or naked!

Sentimental Gift

My grandmother turned 75 today! This is a huge deal because she is one amazing woman. My brother and I wanted to do something special, so we made her this blanket, with memory bows.

blanket

Each bow has a memory written on it. To read the memory she got to untie the bows. We liked this idea, because she could look at a few at a time, and save some for later.

blanket 1

We used fabric markers to write on strips of ribbon that we sewed to the blanket, and tied into bows.

blanket 6

blanket 5

We taped the ribbon to the counter to make writing easier. It turned out, that the length of the diagonal on a sheet of paper, was the perfect length for the bows! We stitched the center of each ribbon to the blanket, with the message facing up, then we tied the bows.

blanket 3

She loved her gift, there were giggles and happy tears, and that was just after untying the first couple of bows.

Sea Kayaking in Vancouver

Ohhh Canada! How lovely it was to visit.

Vancouver 2

Sea kayaking trip while in Vancouver.

The first 4 hours of paddling were quite pleasant. The way back felt like the equivalent of pedaling up a steep hill on a bicycle. We did make it back though, after some serious laughs and shoulder muscle development.

Antique Trunk

I wanted an antique trunk to complete my new bedroom. This was a find from my grandmother’s house, that made it to my house, and before my family members could intervene I started refinishing, which I think is the same as claiming it, right?

Pictured below is the beginning, before I stained my cuticles with wood stain. Trunk 1

I very lightly sanded any areas that were rough, but I wanted to keep the antique finish where possible. Below is what the inside looked like before I got my hands on it.

Trunk 3

I used Minwax, Dark Walnut to stain the outside of the trunk. I love this color. Tip: wear gloves. I also used some q-tips to get into any small indentions, because I wanted the whole trunk to be dark.

minwax dark walnut.001

After the stain dried, I finished with 2 coats of semi-gloss varnish.

Trunk 4

For the inside, I used a 1.5 inch layer of batting from the fabric store. I needed this to cover the occasional nail that poked through the wood. I selected a fabric that I loved, it did not match my room, but that was okay because my trunk would usually be closed. I stapled the fabric to the inside of the trunk.

Trunk - Fabric

Ta-da!

Trunk 6 Trunk 5!

Girl’s Night!

For my roommate’s birthday I made these mini desserts. We had just moved to our new apartment in Dallas, so I was low on time and ingredients. I made this spread using many of same ingredients in multiple desserts.

IMG_3597

The Menu –

– Mini ‘Nilla Wafer Sandwiches: These were a total experiment, but ended up tasting like little chocolate dipped macaroons, and were the first to go! I put a very tiny dollop of banana pudding on one wafer,  layered a slice of fresh banana, then closed the sandwich with another wafer. I dipped half of the mini sandwich in chocolate, half of the batch in white and half in dark chocolate. Then, I refrigerated the sandwiches over night, and I think this was the key! The sandwiches were soft, but not  soggy at all.

– Mini Pudding Cups: Chocolate and Vanilla layers topped with a fresh raspberry, Banana pudding layered with crushed ‘Nilla wafers and topped with a slice of fresh banana and whipped cream

– Mini Cinnamon Twists: Simple pastry dough, twisted and brushed with butter flavored with cinnamon and a touch of nutmeg

– Red Velvet Cake Balls, dipped in white and dark chocolate

IMG_3596

Love Bird Coasters

In the spirit of Valentine’s Day, I wanted to share the “Love Bird” Coasters that I made for my boyfriend.

These were a Christmas gift for him, he is always such a great sport when I give him one of my creations.

Love Birds.001 Love Birds.002

These are made out of cut slices of our Christmas tree. I sanded them, and then sanded again, and again. I used a disc sander, I think I would have been sanding these until Valentine’s Day had I been doing it by hand.

When they were finally smooth and level, I used high gloss spray varnish to finish them. I painted tiny love birds on the back of one of them, because I kind of like this guy.

Rocky Mountains

Skiing is my favorite.

We were lucky enough to be the first chair up on Peak 6, at Breckenridge Ski Resort today. It was neat, but honestly there was plenty of snow to go around.

Snow 3

The view from the Tippitty Top of Breckenridge.

snow 2

My dog Tucker also loves the snow. It must run in the family.

Tucker

Costa Rica

The orphanage and school where we volunteered. The children were amazing, but I decided not to post pictures of them. Please share if you have experience volunteering abroad, it was by far the most amazing part of our time spent in the country.Costa 4

Tres Cruces Hike near San Jose

Costa 3

I can’t seem to stay away from this beautiful country. 3rd time’s the charm.

Costa Rica

Tufted Headbord

My favorite part of my bedroom is my tufted headboard. It was inspired by the York Tufted Headboard from Pottery Barn.

– I traced the shape of the headboard that I wanted on large butcher paper. Please comment if you would like the details on how to do this step, and I will add details!

– My trusty assistant (dad) built the wood frame from this shape. He used 2 sheets of particle board, because plywood may have warped, and reinforced the middle with 2x4s. Please comment for more step-by-step instructions here.

– Using spray adhesive, I covered the wood with 1.5 inch foam from Jo Anne’s Fabrics, and cut the foam to shape.
HB 1

– We put a layer of 1 inch batting over the foam and stapled it to the back of the headboard.

– We used chalk lines on the back of the wood, to ensure that the buttons were in line and equal distance apart. We drilled small holes where we wanted the buttons, but did not drill through the foam.

– The next step is selecting fabric! I suggest using upholstery fabric because you need large enough fabric to avoid having seams show on the headboard. Only use seams if you have to, and try to keep them below the mattress line. We used a sewing machine to add a seam just below the mattress because I wanted a tall headboard!

HB 2

– Stretch the fabric over the wood, and staple to the back. For help on corners, please comment, that step was tedious!

– We purchased a fabric button kit from Hobby Lobby, and followed the instructions  on the kit to complete the buttons, this step was surprisingly easy.

– Using a long needle, we threaded the buttons through the wholes and stapled the string to the back of the headboard. We used upholstery string for added strength. You can depress the buttons to any depth to achieve the tuft that you desire. I liked the small tufts.

– This was the most complicated project I have tackled so far. If you would like, please share your successes or struggles with tufted headboards, or comment for more instruction on the above steps!


Silver Leaf Nightstands

These night stands are part of my bedroom makeover, that I will eventually share in its entirety. First, I want to show you the little gems that made it feel like home!

– Find a nightstand, or piece of furniture, that you want to refinish. I found these on craigslist. They came in a pair, for about $40. I chose them because they were solid wood, I liked the door pattern, and they had original brass hardware.

night

– I sanded any scratches or rough spots. This won’t be necessary if your piece is in good shape.

– I sprayed the entire piece with silver leaf adhesive. It is important to use aspray adhesive .001n adhesive that is intended for leafing because it stays tacky long enough for you to finish the entire piece. Follow the instructions on the can you select to determine how long to wait before applying leaf sheets. I liked the Mona Lisa Spray Adhesive.

– When purchasing leafing, consider gold, bronze, or copper options. An economicalsilver leaf.001  alternative to silver is aluminum leaf, which still works beautifully. I ended up using aluminum.

Be sure to lay the leafing gently and in an area with no wind or breeze, the sheets are so delicate and easily crumble.

– Finish with a varnish. I used the Mona Lisa Spray Varnish, and I liked the effect of using about 5-7 coats. I could use about 1 can per coat on these nigh stands, so I was flying through cans! I would suggest using a regular glossy varnish from Home Depot if you have a large project, as an economical alternative to the Mona Lisa mini cans. The varnish does not need to be leafing specific like the adhesive.

Nighstand 1

More pictures are coming soon!

Succulent Garden

While kayaking with my family in British Columbia, I found a piece of treasure driftwood that I knew would be taking the flight back with us.

It was speckled with tiny abandoned crustacean shells, and a bit of stringy sea-moss. My family advised that I leave the hunk of slimy wood in Canada and just take the “memories.” I didn’t protest, but when they were not looking, I snuck the wood into the tip of my kayak.

tiny crab.It took less than 5 minutes for me to realize that the wood was actually home to an army of tiny crabs. I panicked because I thought an attack was imminent. The next 2 hours of kayaking involved me wriggling in my seat to avoid the tiny guys, and trying to coax them out with my paddle.  Worth it.

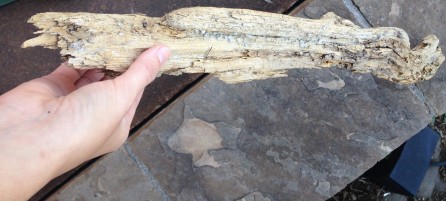
After drying the wood out on our balcony, I packed it in our checked luggage. At this point, the family had accepted that I was not returning to America without it. Pictured below is the wood, I promise it was prettier before it dried out!

IMG_3229

When I got home, the DIY project began!

– For splinter removal, I used a high-grit sandpaper. I didn’t want to sand too much, because the natural texture was neat.

– I stained the wood using Minwax, Dark Walnut Stain. I put gloves on, then put my hand in an old sock and massaged the stain into the wood. I used q-tips to get into the tiny crevices. minwax dark walnut.001

– I sprayed the wood with semi-gloss spray varnish. 3-4 coats is perfect, just be sure to let it dry between coats.

– I cut the top off of a metal baking tin until it was the perfect hight to be a planter. I squeezed the planter into shape, I wanted mine to follow the curve of the wood, then trimmed any areas that looked too tall.

tin .001

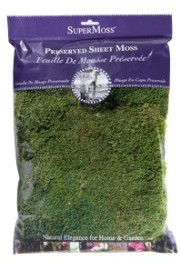
– Using hot glue, I applied strips of moss to the outside of the tin, and just over the top edge to hide the metal. Then I glued the mossy planters to the stained wood.

Moss.001– I filled with succulent potting soil, and planted my favorite tiny succulents. Tip: I bought mini succulents for the majority of the planter, but I bought one large container of ground cover because I wanted some of the plants to hang over the side.

IMG_3228

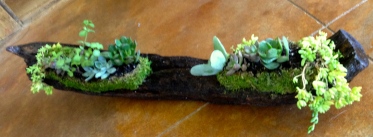
Photo credit for little crab: http://www.trekearth.com/members/henrye/